 |
If you have ever developed an application for mobile, most chances are you have found yourself wanting to create a settings page. The user uses the settings page to set configuration parameters and these parameters are saved even after the program is closed. In this post I will explain how to create a settings page very easily. All code examples are available to download at the bottom. |
Android designers have developed a framework to make the developers life a lot easier.
Preference Framework is a framework composed of a hierarchy of preference objects which are translated to UI objects.
This mechanism is built on top of the shared preferences mechanism which stores the values.
Shared Preferences Mechanism
Before we can explain how to build a settings page with the preferences framework we need to get to know the shared preferences mechanism.
Shared Preferences is a simple key-value storage mechanism of primitive types and Strings.
These values are stored even if the program is terminated.
Use it to store simple variables you wish to save between sessions of the program.
public class MyActivity extends Activity {
     @Override
    protected void onCreate(Bundle state){
       super.onCreate(state);

// Restore preferences
       SharedPreferences settings = getSharedPreferences(“MyParams”, 0);  // zero is the default
       boolean booleanParam = settings.getBoolean("booleanParam", false); //false is the defaulr
    }

    @Override
    protected void onStop(){
       super.onStop();

	// Change preferences
      SharedPreferences settings = getSharedPreferences(“MyParams”, 0);
      SharedPreferences.Editor editor = settings.edit();
      editor.putBoolean("booleanParam", true);

	// Save changes
	 editor.commit();

         }
}
Preferences Framework
As mentioned, the preference framework is a framework which is built on top of the shared preferences mechanism.
But opposed to what you have seen above, in this case you don’t even have to save and load the data every time, the OS does that for you.
Furthermore, this framework offers UI objects that hold persistent preferences.
Types of preferences objects
- CheckBoxPreference – displays a checkbox and stores boolean values
- EditTextPreference – displays a edit text box and stores string values
- ListPreference – displays a drop down list.
- RingtonePreference – displays a list of existing ringtones in the system.
Step 1 – Creating XML preferences menu
First we will create the XML file which represents our settings page.
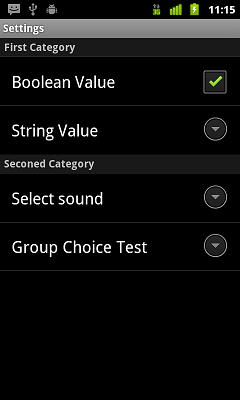
<?xml version="1.0" encoding="utf-8"?>
<PreferenceScreen
	xmlns:android="http://schemas.android.com/apk/res/android"
	android:title="Settings">
	<PreferenceCategory android:title="First Category">
		<CheckBoxPreference android:key="MyBoolean"
			android:title="Boolean Value"></CheckBoxPreference>
		<EditTextPreference android:key="MyText"
			android:title="String Value"
			android:dialogTitle="Edit this text"
			android:dependency="MyBoolean"></EditTextPreference>
	</PreferenceCategory>


	<PreferenceCategory android:title="Seconed Category">
		<RingtonePreference android:showDefault="true"
			android:key="Audio" android:title="Select sound"
			android:ringtoneType="notification">
		</RingtonePreference>
		<ListPreference android:title="Group Choice Test "
			android:entries="@array/PreferencesGroupItems"
			android:entryValues="@array/PreferencesGroupValues"
			android:dialogTitle="Choose an option please">
		</ListPreference>
	</PreferenceCategory>
</PreferenceScreen>
*Notice:
- You can create categories to divide the preferences to groups according to the context. Here we have created 2 categories.
- ListPreference requires 2 arrays, one for the values and one for the labels. Both are taken from values/strings.xml.
- You can create dependency between prefrences by using the dependency field. For example, I have made the text field depended on the checkbox, which means, it will be disabled if the checkbox is not checked.
- Put this xml file under /res/xml/my_prefrences.xml
Step 2 – Extending the PrefrencesActivity
public class PreferencesActivity extends PreferenceActivity {

	@Override
	protected void onCreate(Bundle savedInstanceState) {
		super.onCreate(savedInstanceState);

		addPreferencesFromResource(R.xml.my_prefrences);
	}

}
- As you see, all this activity does is to load the preferences xml file.
Step 3 – Calling the PrefrencesActivity
Now we will create a button in our main activity that will trigger the preferences activity.
 @Override
    public void onCreate(Bundle savedInstanceState) {
        super.onCreate(savedInstanceState);
        setContentView(R.layout.main);


        ((Button)findViewById(R.id.Button01))
		.setOnClickListener(new OnClickListener() {

			@Override
			public void onClick(View v) {
				Intent settingsActivity = new Intent(getBaseContext(),
                        PreferencesActivityTest.class);
				startActivity(settingsActivity);

			}
		});
    }
Step 4 – Using the preferences
We can now use the preferences values anywhere in our main Activity.
SharedPreferences preferences =
			 PreferenceManager.getDefaultSharedPreferences(this);

String myText =	preferences.getString("MyText", "default value");
boolean MyBoolean = preferences.getBoolean("MyBoolean", false);
Custom Preference
You also have the option to add your own customized preference item.
We will talk about this in another post.
 Download demo project
Is is possible to open text view in shared preference
There are 2 options.
1 – Use EditTextPreference which in fact, pops an edit text view when the user press on it.
2 – You can create your own shared preference and make to whatever you would like. This is how toy do it: http://android-journey.blogspot.com/2010/01/for-almost-any-application-we-need-to.html
Hi,
How can I add Icon/Image to each item in ListPreference?
Is it possible to add our own icons to individual item in List-Preference..
Thanks..
Hey Avi,
Your article was very helpful. I was trying to find something in the API to get a TextView to show if the box was checked or not, and all I could find were CheckBox parameters. Thanks so much for the help 🙂
Also, I like your wooden Gnome. He is cute